To do
From Rsewiki
(Difference between revisions)
(→Foot) |
(→Foot) |
||
| (One intermediate revision by one user not shown) | |||
| Line 17: | Line 17: | ||
* Assemble motor and motor-mount block with 4x3mm screws into motor - make sure that motor in upright orientation and motor-mount matches wheel-steer-mount orientation. | * Assemble motor and motor-mount block with 4x3mm screws into motor - make sure that motor in upright orientation and motor-mount matches wheel-steer-mount orientation. | ||
* Insert motor and motor-mount assembly into axle and fixate it to wheel-steer-mount with 2x3mm 50mm long screws and self locking nuts. | * Insert motor and motor-mount assembly into axle and fixate it to wheel-steer-mount with 2x3mm 50mm long screws and self locking nuts. | ||
| − | * Tighten motor axle into motor-to-axle | + | * Tighten motor axle into aluminum flex motor-to-axle and fix it in one end at a time - as possible. Try turn motor or wheel to verify smooth turning. |
| − | + | ||
* Mount foot-base (big block) to steer-mount with 4x long self cutting screws | * Mount foot-base (big block) to steer-mount with 4x long self cutting screws | ||
| Line 26: | Line 25: | ||
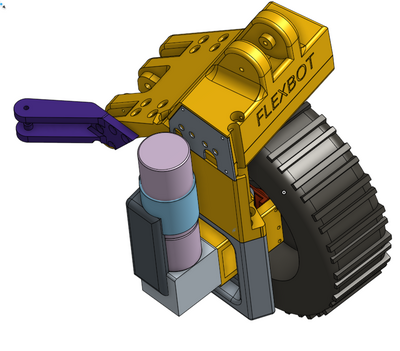
[[File:foot+motor.png|400px]] | [[File:foot+motor.png|400px]] | ||
| + | Front right wheel and foot part. | ||
====Motor and turn part==== | ====Motor and turn part==== | ||
Latest revision as of 14:56, 8 June 2018
Flexbot design to do list
Possible improvements, design ideas and other suggestions.
Back to Flexbot main page
Contents |
[edit] Mechanics
Flexbot 3D print status
[edit] Foot
Assembly order:
- Fix connection (motor-to-axle-mount) to wheel axle with 2x4mm short screws, before inserting into alu wheel-stear-mount
- Alu wheel-steer-mount (with 4 bearings), insert axle assembly (from above) and secure it with wheel-nut - and fasten with pinol
- Insert 5-6mm cylinder peace into turn bearings in wheel-steer-mount, and mount into steer-mount (non turning part) with 2x5mm screws and self-locking nuts. Make sure turn motion is OK.
- Assemble motor and motor-mount block with 4x3mm screws into motor - make sure that motor in upright orientation and motor-mount matches wheel-steer-mount orientation.
- Insert motor and motor-mount assembly into axle and fixate it to wheel-steer-mount with 2x3mm 50mm long screws and self locking nuts.
- Tighten motor axle into aluminum flex motor-to-axle and fix it in one end at a time - as possible. Try turn motor or wheel to verify smooth turning.
- Mount foot-base (big block) to steer-mount with 4x long self cutting screws
- for steering mount blocks on motor (with strip) and on foot-base (4xsmall self cutting screws)
- Mount Firgelli actuator for steering actuation with 2x 4mm 25-35mm long screws and self locking nuts.
Front right wheel and foot part.
[edit] Motor and turn part
(first number is priority, 1. is must, 2. is can maybe do without, 3. would be nice)
- 2. Turn (king-pin) bolt should be 5mm, and with bigger cone for the screw.
- 3. Cut-out for motor (on face with motor axle), for raised ring on motor, should be bigger in diameter.
[edit] Big block
- 2. Make hole for motor driver cooling.
- 2. use higher temperature for orange PETG plastic print (165 degree, not 162)
[edit] Steering
- 1. Mount block on foot do not allow full actuator movement
- 2. Mount of Firgelli too sloppy, maybe a plastic adaptor in each end?
- 1. Mount block in foot end has too small screws, and may be too week.
[edit] Knee
[edit] Hip
[edit] Main body
[edit] Electronics
[edit] Power
- Main power 6-cell LiPo nominel 22.2V (between 20V and 28.5V)
[edit] Teensy
- Teensy 3.2 and Teensy 3.5 for (first level) real time control loops
[edit] Main PC
- Look at a Intel Nuc
[edit] Sensors
[edit] Matlab Model
[edit] Software
[edit] Communication
- Losing IMU i2c communication at knee
