Auball
(→Hue filtered image) |
(→Ball finder plugin) |
||
| (20 intermediate revisions by one user not shown) | |||
| Line 13: | Line 13: | ||
The code in the function is explained below. | The code in the function is explained below. | ||
| + | |||
| + | The images are obtained with the "ucamserver" and the test image "ball08.png", that is loaded into image-pool image 78. | ||
| + | |||
| + | >> poolset img=78 loadpng=./ball08.png | ||
| + | >> ball img=78 filt debug | ||
| + | Using gauss filter (5x5) | ||
| + | Hough circles found 3 circles | ||
| + | AUBall:: 0 (361, 93, 27) Hue=122, sat=114 - blue(122)= 0 off, red(166)=-44 off (OK: blue) | ||
| + | AUBall:: 1 (469, 91, 30) Hue=163, sat=187 - blue(122)= 41 off, red(166)= -3 off (OK: red) | ||
| + | AUBall:: 2 ( 61, 45, 24) Hue=141, sat=127 - blue(122)= 19 off, red(166)=-25 off (NOT: low intensity) | ||
| + | <ball Cnt="2" blue=1, red=1/> | ||
=== Sourse image === | === Sourse image === | ||
| Line 58: | Line 69: | ||
The individual planes shown as grayscale images. | The individual planes shown as grayscale images. | ||
| + | |||
| + | [[File:ball_5271_48_val.png | 500px]] | ||
| + | [[File:ball08_int.png | 400px]] | ||
| + | |||
| + | Figure 48. Intensity, this is the grayscale version of the original image and has 3 lines marked, these are used in the analysis to the left. The balls has a rather low intensity, but never gets below a value of 50. | ||
[[File:ball_5271_46_hue.png | 400px]] | [[File:ball_5271_46_hue.png | 400px]] | ||
| + | [[File:ball08_hue.png | 400px]] | ||
| − | Figure 46. Hue, 0 is yellow (dark like the table, green is about 50 (rather dark), blue is about | + | Figure 46. Hue, 0 is yellow (dark like the table, green is about 50 (rather dark), the blue ball is about 120, the red ball is about 165. Maximum is 179, then it is folds back to 0. The plot shows 3 lines and it is clear that the red ball does not differ too much from the surrounding floor colour. It is further visible that there some colour variation across the ball. |
[[File:ball_5271_47_sat.png | 400px]] | [[File:ball_5271_47_sat.png | 400px]] | ||
| + | [[File:ball08_sat.png | 400px]] | ||
| − | Figure 47. Saturation, the brighter the more saturated the colour. | + | Figure 47. Saturation, the brighter the more saturated the colour. It is visible that the balls have a better saturation than most of the rest of the image. |
| − | + | ||
| − | + | ||
| − | + | ||
| − | + | ||
=== Enhanced image === | === Enhanced image === | ||
| − | The hue is used as the main enhancement, here emphasizing the two selected hues 'redHue=166' and 'blueHue=112' | + | The enhanced image is an attempt to promote the characteristic hue, saturation and intensity of the balls, in such a way that a following edge filter has an easy task in finding the ball edges and suppress all other edges. |
| + | |||
| + | The hue is used as the main enhancement, here emphasizing the two selected hues 'redHue=166' and 'blueHue=112'. | ||
[[File:ball_5271_54_opened.png | 400px]] | [[File:ball_5271_54_opened.png | 400px]] | ||
| + | [[File:ball08_enh.png | 400px]] | ||
| + | |||
| + | Figure 53. A grayscale image where the ball characteristics are promoted (towards 255 (white)). | ||
| + | |||
| + | The enhanced image is constructed from HSV pixel values so that each enhanced pixel e = f(h,s,v) | ||
| + | |||
| + | [[File:code_enhanced_expression.png]] | ||
| − | + | Some of these values Ls = redHue, Lb = blueHue and 13 (redLim and blueLim) are setable parameters (see list at bottom of this page). | |
| − | + | The hue value is from 0 to 179. The red range if folded if reached outside these limits. | |
==== Code ==== | ==== Code ==== | ||
| Line 87: | Line 110: | ||
122 use = enhanceDesiredHue(use, imgSat->mat, varLimitSat->getInt(), imgInt->mat, varLimitValue->getInt()); | 122 use = enhanceDesiredHue(use, imgSat->mat, varLimitSat->getInt(), imgInt->mat, varLimitValue->getInt()); | ||
| − | The enhanced is constructed from HSV pixel values so that each enhanced pixel e = f(h,s,v) | + | The enhanced image is constructed from HSV pixel values so that each enhanced pixel e = f(h,s,v) |
[[File:code_enhanced_expression.png]] | [[File:code_enhanced_expression.png]] | ||
| + | Some of these values Ls = redHue, Lb = blueHue and 13 (redLim and blueLim) are setable parameters (see list at bottom of this page). | ||
| + | The hue value is from 0 to 179. The red range if folded if reached outside these limits. | ||
| − | + | These parameters are fetched at the start of the enhancement function | |
| − | + | [[File:code_enhancement_function_start.png]] | |
| − | + | ||
| − | + | ||
| − | + | ||
| − | + | ||
| − | + | ||
| − | + | ||
| − | + | ||
| − | + | ||
| − | + | ||
| − | + | ||
| − | + | ||
| − | + | ||
The resulting image is set to be available in the image pool as image 45+8 = 53. | The resulting image is set to be available in the image pool as image 45+8 = 53. | ||
| − | Each pixel in the resulting image is based on the same pixel position in the HSV planes | + | Each pixel in the resulting image is based on the same pixel position in the HSV planes as described above, the actual code is: |
| − | + | ||
| − | + | [[File:code_enhanced_actual_code.png]] | |
| − | + | ||
| − | + | ||
| − | + | ||
| − | + | ||
| − | + | ||
| − | + | ||
| − | + | ||
| − | + | ||
| − | + | ||
| − | + | ||
| − | + | ||
| − | + | ||
| − | + | ||
| − | + | ||
| − | + | ||
| − | + | ||
| − | + | ||
| − | + | ||
| − | + | ||
| − | + | ||
| − | + | ||
| − | + | ||
| − | + | ||
| − | + | ||
| − | + | ||
| − | + | ||
| − | + | ||
| − | + | ||
| − | + | ||
| − | + | ||
| − | + | ||
=== Opening === | === Opening === | ||
| − | The | + | The enhanced image is likely to have smaller areas similar to the ball enhanced, these are removed/reduced by an opening filter. |
[[File:ball_5271_53_enhanced.png | 400px]] | [[File:ball_5271_53_enhanced.png | 400px]] | ||
| Line 156: | Line 137: | ||
====Code==== | ====Code==== | ||
| − | The opening code is straight forward - a number of erodes followed by the same number of | + | The opening code is straight forward - a number of erodes followed by the same number of dilations. |
| − | + | ||
| − | + | [[File:code_opening_filter.png]] | |
| − | + | ||
| − | + | ||
| − | + | ||
| − | + | ||
| − | + | ||
=== Smoothing === | === Smoothing === | ||
| Line 171: | Line 147: | ||
[[File:ball_5271_55_filtered.png | 400px]] | [[File:ball_5271_55_filtered.png | 400px]] | ||
| + | [[File:ball08_enh_filt.png | 400px]] | ||
Figure 55. The smoothing is a Gauss blur with a mask size of 5 ('filter="1 5"'). | Figure 55. The smoothing is a Gauss blur with a mask size of 5 ('filter="1 5"'). | ||
| Line 178: | Line 155: | ||
Blur filtering is optional but recommended. | Blur filtering is optional but recommended. | ||
| − | + | [[File:code_enh_gauss.png]] | |
| − | + | ||
| − | + | ||
| − | + | ||
| − | + | ||
| − | + | ||
| − | + | ||
| − | + | ||
| − | + | ||
| − | + | ||
| − | + | ||
| − | + | ||
| − | + | ||
| − | + | ||
| − | + | ||
| − | A | + | A Gaussian blur is used here, but a median could be used too. |
=== Hough transform === | === Hough transform === | ||
| Line 214: | Line 177: | ||
Figure 50. The found circles (balls?) are shown in the original image with blue and red circles. The removed top part is shown as a red line. The white ring is a rejected circle. | Figure 50. The found circles (balls?) are shown in the original image with blue and red circles. The removed top part is shown as a red line. The white ring is a rejected circle. | ||
| + | The green squares in the circles ar the area, where the colour of the ball is checked (see below). | ||
====Code==== | ====Code==== | ||
| − | The result of the Hough transform is delivered in a vector with 3 floats (line | + | The result of the Hough transform is delivered in a vector with 3 floats (line 191). |
| − | + | [[File:code_hough.png]] | |
| − | + | ||
| − | + | ||
| − | + | ||
| − | + | ||
| − | + | ||
| − | + | ||
| − | + | ||
| − | + | ||
| − | + | ||
| − | + | ||
| − | + | ||
| − | + | ||
| − | === | + | ===Ball check=== |
| − | The | + | The code in this function filters the found circles |
| − | + | 674 void findUsableCircles(std::vector<cv::Vec3f> & circles, | |
| + | std::vector<UCircle> & usable, | ||
| + | UImage * imgHue, int tl, | ||
| + | UImage * imgAnn, | ||
| + | UImage * imgSat, | ||
| + | UImage * imgVal) | ||
| + | { | ||
| + | ... | ||
| − | + | For each circle, the average hue, saturation and value are tested in a square area in this code. | |
| − | + | [[File:code_get_centre_values.png]] | |
| − | The | + | The average value is calculated in a subroutine (line 888), and further draws the used square in the annotated image (if used with the debug option). |
| − | + | ===Ball overlap=== | |
| − | + | There is further an overlap filter. If two Hough circles overlap, then the circle with the best colour (hue) match is selected (from line 759). | |
| + | |||
| + | |||
| + | === Canny === | ||
| + | |||
| + | The Hough includes a canny edge detector, to make the image binary. | ||
| + | |||
| + | [[File:ball_5271_51_canny.png | 400px]] | ||
| + | |||
| + | Figure 51. A replica of the Canny edge filtered image that the Hough transform uses as the basis for estimation. | ||
=== Reporting === | === Reporting === | ||
| − | The rest of the code (line | + | The rest of the code in the HandleCommand function (line 208 to line 270) is for reporting the result to the client and to the MRC. |
== Parameters == | == Parameters == | ||
Latest revision as of 14:19, 16 February 2020
Back to AU Robot Servers
Contents |
[edit] Ball finder plugin
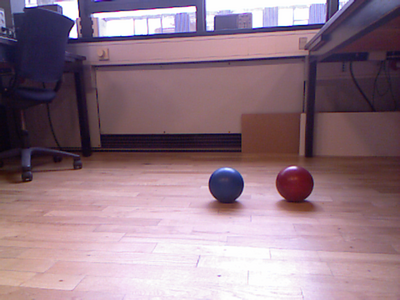
A plugin intended for finding coloured balls in a camera image. This example is an image (ball08.png) from a Kinect camera with 2 balls at daylight.
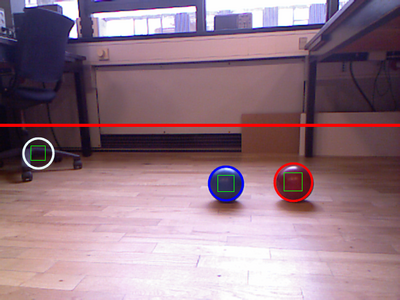
Figure 78 (and 50). There are two balls, a red and a blue. These are marked in the second image (50) by the plugin, the white circle is a failed circle candidate. The red line is the top limit, where to look for balls.
The code in the function is explained below.
The images are obtained with the "ucamserver" and the test image "ball08.png", that is loaded into image-pool image 78.
>> poolset img=78 loadpng=./ball08.png
>> ball img=78 filt debug
        Using gauss filter (5x5)
        Hough circles found 3 circles
        AUBall::  0 (361, 93, 27) Hue=122, sat=114 - blue(122)=  0 off, red(166)=-44 off (OK: blue)
        AUBall::  1 (469, 91, 30) Hue=163, sat=187 - blue(122)= 41 off, red(166)= -3 off (OK: red)
        AUBall::  2 ( 61, 45, 24) Hue=141, sat=127 - blue(122)= 19 off, red(166)=-25 off (NOT: low intensity)
        <ball Cnt="2" blue=1, red=1/>
[edit] Sourse image
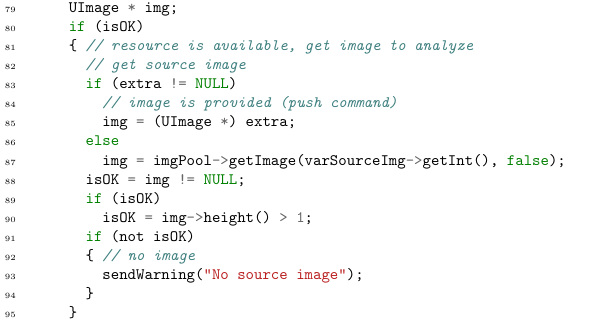
The code in the file ufuncball.cpp to get the sourse image is
The UImage type is a class that holds a version of the image that can be transferred to the client and a cv::Mat version for openCV manipulation.
Line 87 get the image from the image pool with the number specified in the (global) variable "poolImg=18" with the call 'varSourceImg->getInt()'.
[edit] convert to HSV
The same image in HSV format
Figure 45. A high hue value shown as blue, a high saturation in green (e.g. the dark red in the front and the blue lit in the back), the intensity (value) is shown in red (ex. the cup in the front). White objects have a hue of 0, the hue of dark objects is unreliable.
[edit] Code
101  // split into planes
102  splitIntoHSVChannels(img, imgHSV, imgHue, imgSat, imgInt, imgRGB);
This is a call to a function that converts to HSV and splits the HSV image into 3 grayscale images
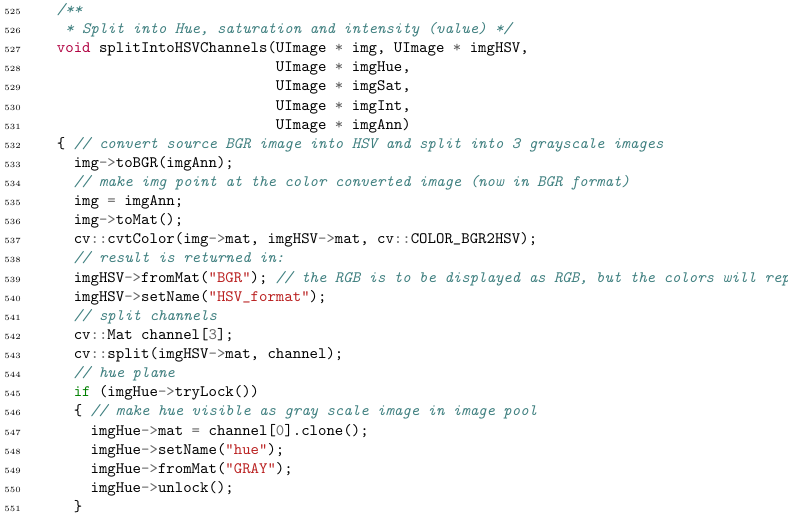
This function takes 6 images as parameters. The source updates the cv::Mat version of the image in line 536, and then makes a color conversion from BGR to HSV using the 'cv::COLOR_BGR2HSV' parameter in line 537. The image is then loaded back to the image pool and given a new name in lines 539 and 540.
The splitting of the color planes are in line 543 into an array with 3 cv::Mat objects. The remaining lines are to get images back to the image pool.
[edit] Crop
The image is cropped to the interesting Range Of Interest, here the top 200 rows are removed (parameter 'topLine').
NB! the parameters used in this example is listed at the bottom of this page.
[edit] Split into planes
The individual planes shown as grayscale images.
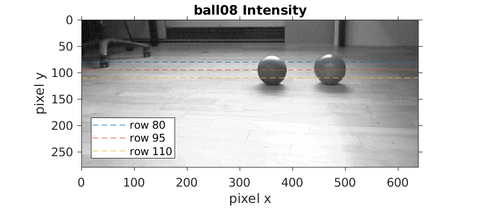
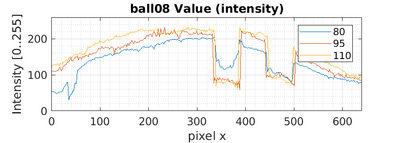
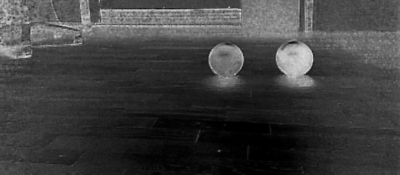
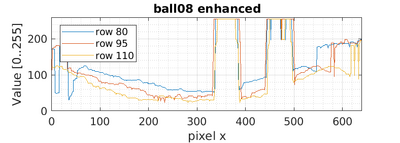
Figure 48. Intensity, this is the grayscale version of the original image and has 3 lines marked, these are used in the analysis to the left. The balls has a rather low intensity, but never gets below a value of 50.
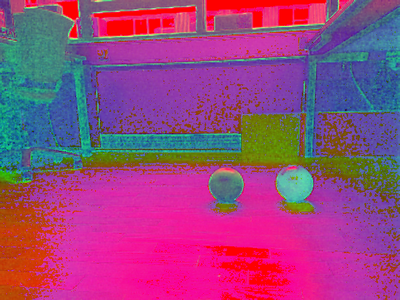
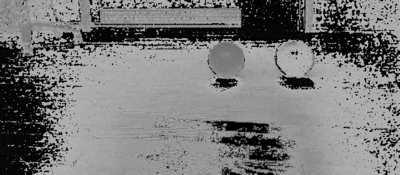
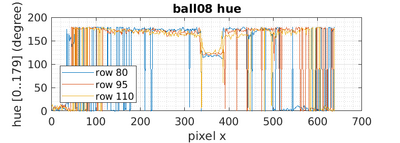
Figure 46. Hue, 0 is yellow (dark like the table, green is about 50 (rather dark), the blue ball is about 120, the red ball is about 165. Maximum is 179, then it is folds back to 0. The plot shows 3 lines and it is clear that the red ball does not differ too much from the surrounding floor colour. It is further visible that there some colour variation across the ball.
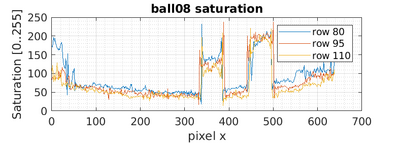
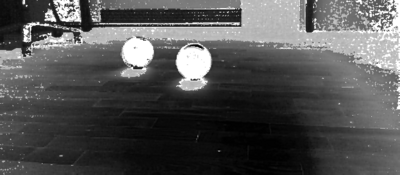
Figure 47. Saturation, the brighter the more saturated the colour. It is visible that the balls have a better saturation than most of the rest of the image.
[edit] Enhanced image
The enhanced image is an attempt to promote the characteristic hue, saturation and intensity of the balls, in such a way that a following edge filter has an easy task in finding the ball edges and suppress all other edges.
The hue is used as the main enhancement, here emphasizing the two selected hues 'redHue=166' and 'blueHue=112'.
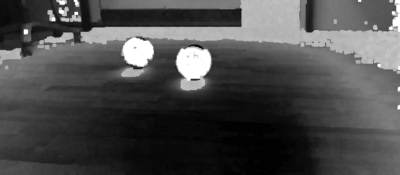
Figure 53. A grayscale image where the ball characteristics are promoted (towards 255 (white)).
The enhanced image is constructed from HSV pixel values so that each enhanced pixel e = f(h,s,v)
Some of these values Ls = redHue, Lb = blueHue and 13 (redLim and blueLim) are setable parameters (see list at bottom of this page). The hue value is from 0 to 179. The red range if folded if reached outside these limits.
[edit] Code
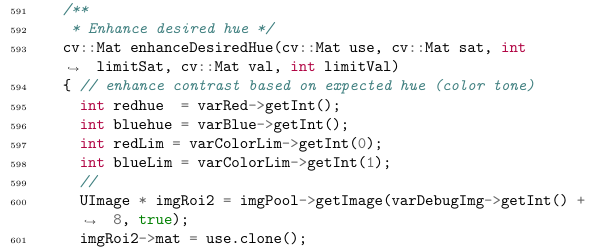
The filter is implemented in a sub-function:
121  // enhance contrast based on known hue for red and blue ball
122  use = enhanceDesiredHue(use, imgSat->mat, varLimitSat->getInt(), imgInt->mat, varLimitValue->getInt());
The enhanced image is constructed from HSV pixel values so that each enhanced pixel e = f(h,s,v)
Some of these values Ls = redHue, Lb = blueHue and 13 (redLim and blueLim) are setable parameters (see list at bottom of this page). The hue value is from 0 to 179. The red range if folded if reached outside these limits.
These parameters are fetched at the start of the enhancement function
The resulting image is set to be available in the image pool as image 45+8 = 53.
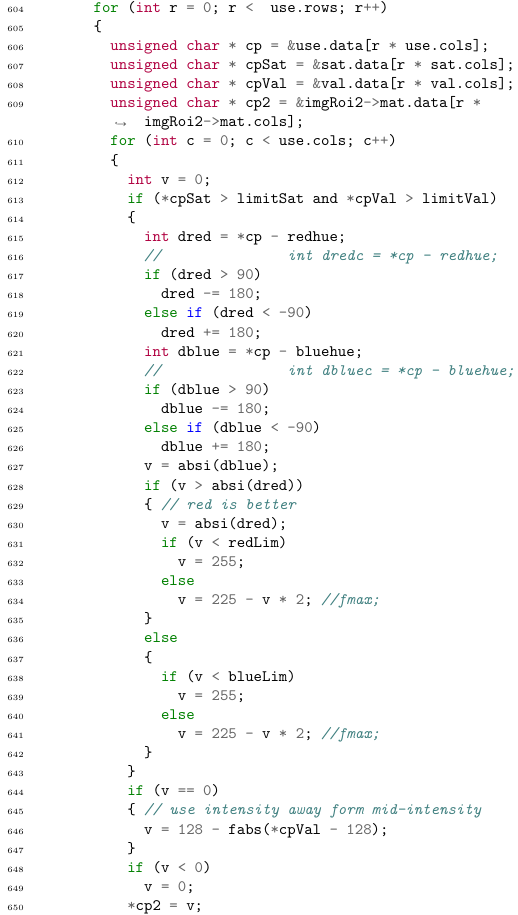
Each pixel in the resulting image is based on the same pixel position in the HSV planes as described above, the actual code is:
[edit] Opening
The enhanced image is likely to have smaller areas similar to the ball enhanced, these are removed/reduced by an opening filter.
Figure 54. Result of an opening operation with a 3x3 (all ones) erosion (twice, if 'opening=2') followed by dilation the same number of times.
[edit] Code
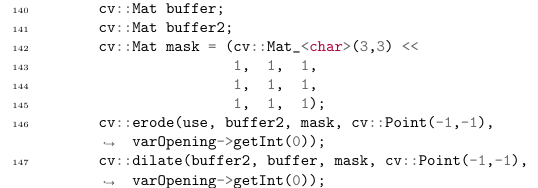
The opening code is straight forward - a number of erodes followed by the same number of dilations.
[edit] Smoothing
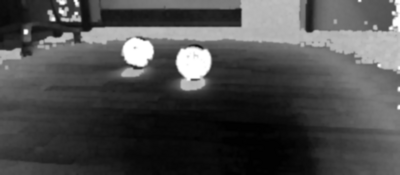
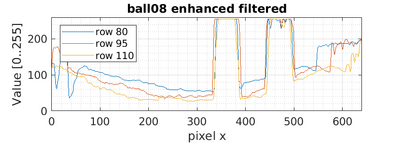
The resulting image is then smoothed to get softer edges better suitable for a canny edge detector.
Figure 55. The smoothing is a Gauss blur with a mask size of 5 ('filter="1 5"').
[edit] Code
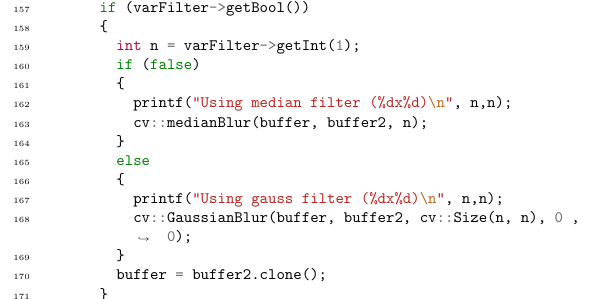
Blur filtering is optional but recommended.
A Gaussian blur is used here, but a median could be used too.
[edit] Hough transform
The Hough transform is performed on the filtered image with a number of parameters ('hough="700 70 5").
The used canny filter has a high limit of 700 (and a low limit of 350 (half)). The second parameter 70 represents the voting of there is a circle with a centre at this position. The last parameter 5 is the resolution of the centre position, in this case all centre votes within 5 pixels are counted.
The Hough transform found these circles.
Hough circles found 3 circles
AUBall::  0 (361, 93, 27) Hue=122, sat=114 - blue(122)=  0 off, red(166)=-44 off (OK: blue)
AUBall::  1 (469, 91, 30) Hue=163, sat=187 - blue(122)= 41 off, red(166)= -3 off (OK: red)
AUBall::  2 ( 61, 45, 24) Hue=141, sat=127 - blue(122)= 19 off, red(166)=-25 off (NOT: low intensity)
The numbers in brackets are pixel position and circle radius, then the HSV values and how far the hue is from the two colors. In the last bracket is the colour detection (1 for red and 2 for blue).
Figure 50. The found circles (balls?) are shown in the original image with blue and red circles. The removed top part is shown as a red line. The white ring is a rejected circle. The green squares in the circles ar the area, where the colour of the ball is checked (see below).
[edit] Code
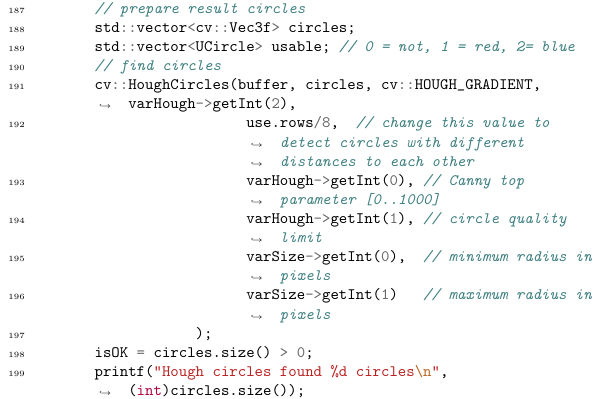
The result of the Hough transform is delivered in a vector with 3 floats (line 191).
[edit] Ball check
The code in this function filters the found circles
674        void findUsableCircles(std::vector<cv::Vec3f> & circles,
                                  std::vector<UCircle> & usable,
                                  UImage * imgHue, int tl,
                                  UImage * imgAnn,
                                  UImage * imgSat,
                                  UImage * imgVal)
           {
               ...
For each circle, the average hue, saturation and value are tested in a square area in this code.
The average value is calculated in a subroutine (line 888), and further draws the used square in the annotated image (if used with the debug option).
[edit] Ball overlap
There is further an overlap filter. If two Hough circles overlap, then the circle with the best colour (hue) match is selected (from line 759).
[edit] Canny
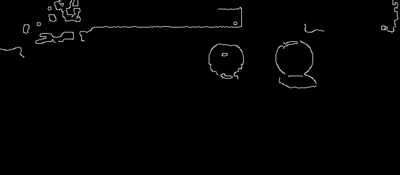
The Hough includes a canny edge detector, to make the image binary.
Figure 51. A replica of the Canny edge filtered image that the Hough transform uses as the basis for estimation.
[edit] Reporting
The rest of the code in the HandleCommand function (line 208 to line 270) is for reporting the result to the client and to the MRC.
[edit] Parameters
The code uses a number of parameters, these are
>> var ball
<help subject="var list" name="ball">
Description:                  camera based ball detect (compiled Feb 16 2020 09:23:37)
  poolImg=77                 (r/w) image pool number to use as source
  poolDebugImg=45            (r/w) first image pool number to use for interim images
  redHue=166                 (r/w) hue value (in HSV formet) for red ball range [0-180]
                             (~120=red)
  redCnt=1                   (r) Number of red balls found in last image
  blueHue=122                (r/w) hue value (in HSV formet) for blue ball range
                             [0-180] (~0=blue)
  blueCnt=1                  (r) Number of blue balls found in last image
  BallSize=0.12              (r/w) Size of the ball (diameter [m])
  topLine=200                (r/w) is the topmost line that could be a ball on the
                             floor.
  size=15 60                 (r/w) size limits of ball in pixels [min max]
  hough=400 40 2             (r/w) params for Hough (canny high [0-1000], hough vote
                             [0..255], Hough resolution 1(fine)..8(rough))
  colLim=13 13               (rw) Color limit (+/-) for circle center hue match [red
                             blue] [0..180]
  mrc=1                      (rw) Should result be send to MRC (smrcl)
  debug=1                    (rw) make more debug images and printout
  filter=1 5                 (rw) smooth image before detect [filter 0-1, size NxN]
  opening=2                  (rw) Opening before Hough circles
  limitSat=80                (rw) do not use pixels with saturation lower than this
                             (0..255)
  limitVal=50                (rw) do not use pixels with a lower V-value (intensity)
                             lower than this (0..255)
(H: has time series, L: is logged, R: replay)
</help>
<var info="done"/>
They can be modified with eg:
>> var ball.topLine=175
                              <var name="ball.topLine" typ="d" size="1" value="175"/>
>> var ball.hough="300 40 2"
                              <var name="ball.hough" typ="d" size="3" value="300 40 2" oldValue="400 40 2"/>
To change the top line cut to 150 pixels rather than 200, and change one of the Hough parameters.
