Web Interface
(→Usage of web-interface) |
(→Tabs) |
||
| Line 49: | Line 49: | ||
== Tabs == | == Tabs == | ||
| − | + | 1. The "legs" tab is a table with the status of each leg. | |
| − | + | 2. The "Cameras" tab is 2 video feeds, one for color and one for depth. Keep in mind that the feed with depth is 16bit gray and thus JavaScript can't present it correctly so everything greater than 255 is getting rounded down to 255. | |
| − | + | 3.The "Mission" tab holds the mission text area where a new mission can be written and submitted or the current mission can be extracted. | |
== Mission commands == | == Mission commands == | ||
Revision as of 09:23, 5 February 2020
Contents |
TODO
Explain where to change things!
just like struct for mission commmands mission textfile position (cmds.h)
maybe highlight cmds.h explain the file strcuture and the communication structure
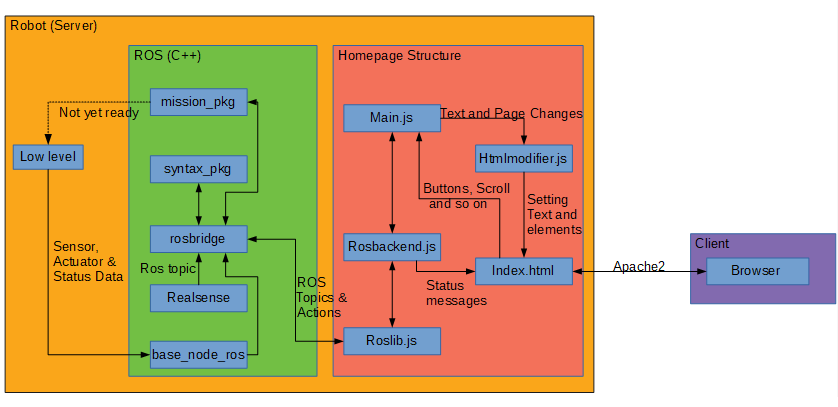
Packages added/made for ROS
- realsense (For visual data as ROS topics)
- rosbridge (For connecting ROS to the local network)
- mission_pkg (Handles mission files)
- syntax_pkg (Checks mission for syntax errors when committing)
Usage of web-interface
Side bar
Go to the robots ip address in the browser, remember to be on the same network!
http://flexbot.local/
To the left we have the status panels, the top one is the status of ROS and looks like this:
It has 3 states, Checking, Closed and Connected. Remember to refresh each time the robot boots or restarts.
The next panel is the mission status and looks like this:
This indicates what it is currently doing, like receiving mission, checking for syntax and so forth.
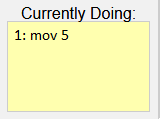
The third panel is the more in depth detail of what the robot is doing currently. It looks like this:
which in this case says at line 1 it has the command to move 5.
The last element in the side panel is the start and stop bottom, it will automatically go back to the idle state when the mission is complete, if it is not complete and the stop button is pressed it will cancel the mission. The buttons looks like this:
Tabs
1. The "legs" tab is a table with the status of each leg.
2. The "Cameras" tab is 2 video feeds, one for color and one for depth. Keep in mind that the feed with depth is 16bit gray and thus JavaScript can't present it correctly so everything greater than 255 is getting rounded down to 255.
3.The "Mission" tab holds the mission text area where a new mission can be written and submitted or the current mission can be extracted.
Mission commands
Mov
Goto
Structure of the web-interface
Packages in depth
realsense camera
Installing rosrealses
To start of with we run the following command to reconfigure it to ros melodic:
sudo apt install ros-melodic-ddynamic-reconfigure
After that we can follow the guide given here, but i'll write my approach below https://github.com/IntelRealSense/realsense-ros#step-3-install-intel-realsense-ros-from-sources
Here the commands used to download and install the ros package can be seen:
cd ~/flexbot_ws/src/
git clone https://github.com/IntelRealSense/realsense-ros.git
cd realsense-ros/
git checkout `git tag | sort -V | grep -P "^\d+\.\d+\.\d+" | tail -1`
cd ~/flexbot_ws
At last we build and source it using
catkin_make
source ~/flexbot_ws/devel/setup.sh
To launch it use, remember to source or be in the right directory before launch
roslaunch realsense2_camera rs_flexbot.launch
roslibjs
Installing rosbridge
This library makes it possible to use ros commands with javascript over a chosen port. The first two lines goes to the source in the catkin workspace and creates a package for ros:
cd ~/flexbot_ws/src
catkin_create_pkg robot_gui_bridge rosbridge_server
Next we install the rosbridge package
apt-get install ros-melodic-rosbridge-server
Now we create the launch file directory and the file used for launch
mkdir ~/flexbot_ws/src/robot_gui_bridge/launch
touch ~/flexbot_ws/src/robot_gui_bridge/launch/websocket.launch
Now at last we write the the necessary launch commands into the file and source it so we can use it from any directory om this terminal:
echo '<launch> <include file="$(find rosbridge_server)/launch/rosbridge_websocket.launch"/></launch>' >> ~/flexbot_ws/src/robot_gui_bridge/launch/websocket.launch
source ~/flexbot_ws/devel/setup.bash
To test if it works run and look for errors:
roslaunch robot_gui_bridge websocket.launch
Setting up the connection
First check if the following command gives multiple ip's if so find a way to extract the correct one:
hostname -I
Now to setup the client, which is the computer not on the robot, write the following 3 lines in your "~/.bashrc" script:
# write these inside ~/.bashrc
export ROS_HOSTNAME='hostname -I'
export ROS_IP="hostname -I"
export ROS_MASTER_URI='http://flexbot.local:11311/'
Now to setup the server, which is the computer on the robot, write the following 2 lines in the "~/.bashrc" script:
# write these inside ~/.bashrc
export ROS_IP=flexbot.local
export ROS_MASTER_URI='http://flexbot.local:11311/'
finalizing the server
Install apache to be able to access remotely :
sudo apt install apache2
Now insert the desired HTML, CSS and javascript files into
/var/www/html/
At last create a script inside
/etc/network/if-up.d/
Which will be executed when connecting to a network. To ensure it not happening multiple times a flag is set when run the first time. The script can be seen in
/etc/network/if-up.d/robotAutoStart.sh
and has a hardlink file in ~/flexbot_ws to make it easily accessible
syntax package
Not much to say, the package files are located inside
~/flexbot_ws/src/syntax_pkg/
and it checks for valid syntax in the submitted code. If there is error it returns the error type and where. If successful it saves the code in
~/flexbot_ws/mission.txt
Furthermore to add new commands simply add the word and how many arguments it takes inside the struct declaration in the file:
~/flexbot_ws/src/include/cmds.h
and build the code again
mission package
The package files are located inside
~/flexbot_ws/src/mission_pkg/
This package hasn't got any specific use now since it at the moment only reads the mission, runs the corresponding function and returns what line it is running at the moment. It is possible to cancel a mission but not to pause and resume it.
TODO
Make the defined functions actually do things rather than only giving feedback to the user and implement new commands if desired.


