Fejemis Teensy
Back to fejemis
Contents |
Drive Teensy
Block diagram with all interfaces and interface protocol
Front Teensy
Block diagram with all interfaces and interface protocol
GUI
Using USB
Using the bridge
Software structure
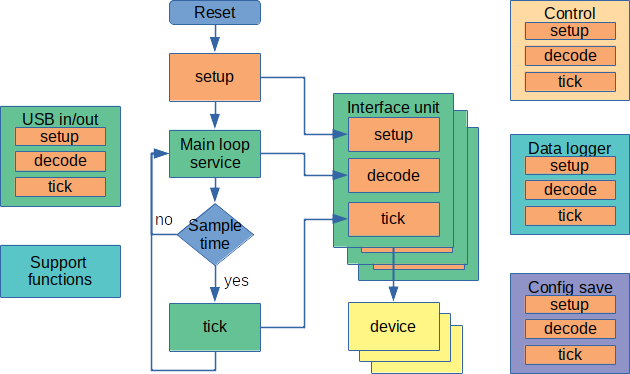
Figure: The Teensy software is structured with a main loop and a number of units. After reset all units are initialized in a setup function, after that the main loop is entered. The main loop services the USB and send commands to the units for decoding. At regular intervals, the sample clock tick, all units are called to execute any sample time function. Most units are interfaces to external devices such as IMU, motor drive or distance sensor. There is further support units for e.g. control.
Setup - loop overview
The setup and loop structure follows the Arduino sketch format. The file is a C++ file as the compilation is using a Makefile rather then the Arduino IDE.
The main file (main.cpp) code has this structure (shortened for clarity)
void setup()   // INITIALIZATION
{
 usb.setup();
 led.setup();
 imu.setup();
 enc.setup();
 sensor.setup();
 motor.setup();
 state.setup();
}
void loop(void)
{
 usb.send("# Starting main loop\n");
 while ( true )
 { // main loop
     usb.tick();     // incoming command service
   if ( startNewCycle ) // start of new control cycle
   { // mostly every 1ms
     imu.tick();     // for heading estimate
     sensor.tick();  // AD converter, e.g. battery maintenance
     irdist.tick();  // distance sensor
     enc.tick();     // wheel encoder and odometry
     state.tick();   // e.g. emergency stop
     control.tick(); // feedback control
     motor.tick();   // motor control
   }
 }
}
Unit structure
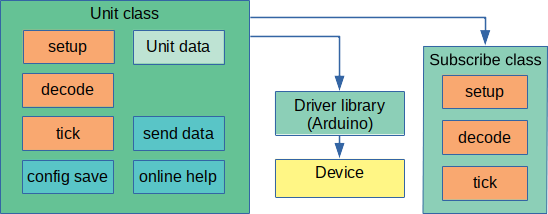
Figure: Each unit is coded in a separate file and has about the same structure. The unit is a class that holds the data from or to the device. The device is configured when the setup is called. The data from the device, or calculated from the data, is made available for subscription using a subscription class called USubss. The device is accessed using a standard Arduino-type library, for e.g. a I2C or an A/D interface. The unit may have configuration that need to be saved, e.g. calibration data or device mode that can be set from the interface, but needs to be saved.
Command decode
Commands from the USB connection is line oriented and consist of one line of text starting with a keyword. The line ends with a "new-line" (\n) or a combination if "carriage-return" (\r) and "new-line".
Request of data can be just the keyword, e.g.:
help   (for on-line help - list of available commands)
gyroi  (for one-time information about gyro measurement)
bati   (for one-time info about battery voltage)
or a keyword with parameters
ctrli vel (to get all the PID control parameters for velocity control)
Issue commands or send data, e.g.:
motv m1 m2  (to set motor 1 (left) and motor 2 (right) to a specified voltage.
rc e v t    (to do remote drive control with velocity "v" and turn-rate "t")
Subscription
From the USB most data can be subscribed with the a line starting with the keyword "sub", e.g.:
sub gyro 10  (for subscription to gyro data every 10ms)
sub bat 200  (for subscription to battery status every 200ms)
The available subscriptions are generated in the "setup" part of the unit and holds also the on-line help text.
E.g. the wheel encoder unit has this subscription setup code (in enc.cpp):
void setup()
{
 ...
 addPublistItem("enc", "Get encoder value 'enc encoder interrupts' (integer)");
 addPublistItem("pose", "Get current pose 'pose t x y h' (sec,m,m,rad)");
 addPublistItem("vel", "Get velocity 'left right' (m/s)");
 addPublistItem("conf", "Get robot configuration (radius, radius, gear, pulsPerRev, wheelbase, sample-time)");
}
At tick-time subscriptions are serviced, and if it is time, the "sendData(n)" is called, e.g. for the wheel encoder unit:
void UEncoder::sendData(int item)
{
 if (item == 0)
   sendEncStatus();
 else if (item == 1)
   sendPose();
 else if (item == 2)
   sendVelocity();
 else if (item == 3)
   sendRobotConfig();
}
Configuration save
Use of configuration flash.
Update tick
Sample rate and sensor calculation

