Robobot
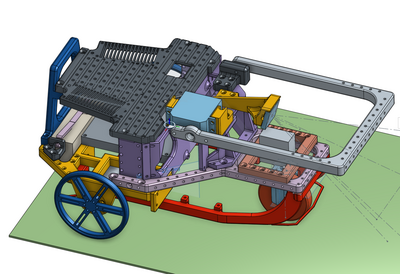
This page is for ROBOBOT, an extension of REGBOT with a raspberry pi and three wheels.
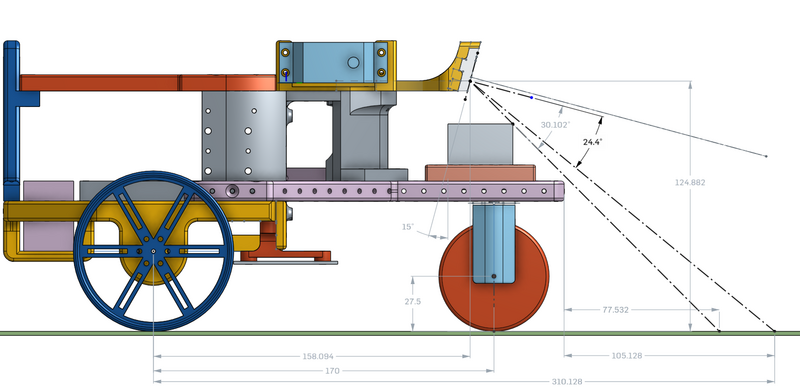
Figure 1. Robobot drawing (V4), all distances in mm (front wheel not in right place, as the turn servo is turned the other way) - see drawing https://cad.onshape.com/documents/97c36fb21a7a858c57c0af9f/w/0d867586bc28d7a9194d7ff3/e/ca0f539fa3eee3cfe0ed4130 .
Contents |
Getting started
This section contains a quick-start guide for the user. It includes how to get the robot connected to Eduroam WiFi for easy access, an explanation of software and software structure and present a few examples to get the robots driving. Press the link below to go to the instructions page.
Instructions for getting started
Installation instructions
This section contains the complete instructions for setting up a clean Raspberry Pi.
Click on the link below to go the instructions.
Raspberry Full installation instructions
Windows tools
Use winscp (from https://winscp.net/eng/download.php?TB_iframe) to move files to and from the raspberry pi.
Use putty (from https://www.chiark.greenend.org.uk/~sgtatham/putty/latest.html) to get terminal access to the raspberry.
To connect to raspberry using a cable (from raspberry direct to a PC) requires that both has a manually set IP adress. The Raspberry side is 192.168.0.2, and you should probably manually set the IP of your PC to the same local net, e.g. 192.168.0.100.
There is a windows executable client for configuration and setting up the Regbot part of the Robobot. This is found in 'regbot/qtgui/dist/regbot.exe' in the raspberry, and can be fetched using winscp.
Update Robobot source
On the raspberry there is the following directories:
$ ls
  mission          Mission software skeleton that can also access the raspberry camera
  qtgui            Copy of the configuration gui (python files), and a windows executable in the 'dist' subdirectory
  regbot           Firmware for the Regbot part
  robobot_bridge   The connection software between the Regbot, the small display, the remote control and the mission software
All these source directories are already connected to a SVN repository, but probably need update, by
cd
cd mission
svn up
cd ../qtgui
svn up
cd ../regbot
svn up
cd ../robobot_bridge
svn up
If there is updates, then they need a recompile (except qtgui).
Mission and Robobot_bridge has a 'build' subdirectory with a Makefile, Regbot has the Makefile in the base directort.
Type
make
to compile
Robobot_bridge is started from the startup script /etc/rc.local, and thus need a rebbot to start the new version,
or start it manually (is also better for debugging, as it has some on-line help (type help after start):
sudo pkill robobot_bridge
cd ~/robobot_bridge/build
sudo ./robobot_bridge
After a regbot compile, the generated regbot.hex need to be loaded into the teensy, this can be done from the raspberry, if you have a screen and a keyboard (or a computer with an X-server), or from another computer, but requires that a USB cable to that computer and install the loader application (from https://www.pjrc.com/teensy/loader.html )
Setup issues
A number of parameters in the REGBOT part of the robot needs setting.
Some suggestions are provided here:
Hardware
The Robobot frame is 3D printed, the design is in onshape - see this link https://cad.onshape.com/documents/97c36fb21a7a858c57c0af9f/w/0d867586bc28d7a9194d7ff3/e/ca0f539fa3eee3cfe0ed4130, in the list of parts to the left it is possible to export (right-click) as STL files, that you can slice for your 3D printer.
The remaining hardware (mostly electronics) is described (to be) on the on the Robobot Hardware page.
Status
Se status for robotter sammen med regbot status: REGBOT_robot_status#Robobot.

