Fejemis battery control
(Created page with "Back to fejemis == Introduction == The battery system is 24V, but split into 2x11.1V Lip batteries. Each battery has a charger and a charge control board as shown in the...") |
|||
| Line 4: | Line 4: | ||
The battery system is 24V, but split into 2x11.1V Lip batteries. | The battery system is 24V, but split into 2x11.1V Lip batteries. | ||
| − | Each battery has a charger and a charge control board as shown in the schematic below: | + | |
| + | Each battery has a charger and a charge control board as shown in the schematic below. | ||
| + | |||
| + | Another board combines the two batteries and has a number of XT60 plugs for power distribution as shown below. | ||
| + | |||
| + | ==== Charger board ==== | ||
| + | |||
| + | [[File:fejemis_power_switch.png | 800px]] | ||
| + | |||
| + | Battery charge board: The battery is connected (with an XT60) at top-center called 'BAT' with the balancing cable at the pins just below. The charger is connected to the left (again XT60 and balance plug), The charge is disconnected using a relay, when not in use. The relay is activated with a small 6V supply from 230V mains (RELAY_6V). The battery meter is connected when power is on using Q3 and Q1. The AD3-CHARGE (lower-right) is for the u-processor to detect that we are charging. | ||
| + | |||
| + | ==== Power distribution board ==== | ||
[[File:fejemis_power_switch.png | 800px]] | [[File:fejemis_power_switch.png | 800px]] | ||
Revision as of 12:32, 12 September 2022
Back to fejemis
Introduction
The battery system is 24V, but split into 2x11.1V Lip batteries.
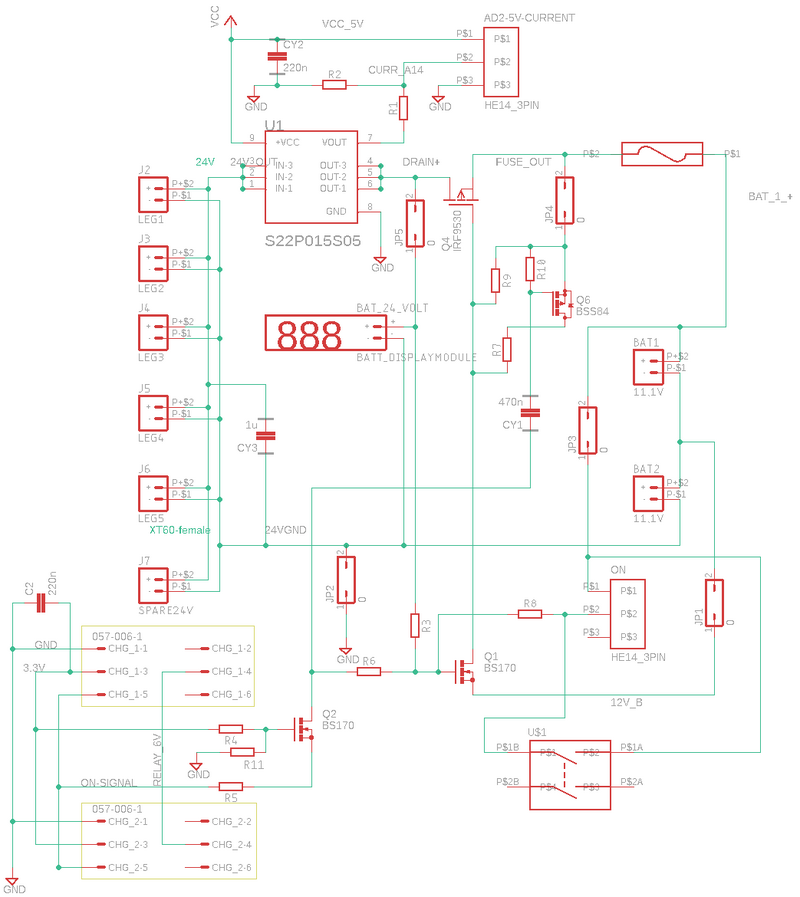
Each battery has a charger and a charge control board as shown in the schematic below.
Another board combines the two batteries and has a number of XT60 plugs for power distribution as shown below.
Charger board
Battery charge board: The battery is connected (with an XT60) at top-center called 'BAT' with the balancing cable at the pins just below. The charger is connected to the left (again XT60 and balance plug), The charge is disconnected using a relay, when not in use. The relay is activated with a small 6V supply from 230V mains (RELAY_6V). The battery meter is connected when power is on using Q3 and Q1. The AD3-CHARGE (lower-right) is for the u-processor to detect that we are charging.
