ESC calibration
(→Test propeller rotation direction) |
(→Connect battery and set 'stick' to 0) |
||
| Line 43: | Line 43: | ||
[[File:esc-calibration-min-stick-gui.png | 600px]] | [[File:esc-calibration-min-stick-gui.png | 600px]] | ||
| − | Set values to 0 for all motors and press 'Apply manual values' (and apply within 3 seconds after two beeps!). | + | Set values to 0 for all motors and press 'Apply manual values' (and apply within 3 seconds after the first two beeps!). |
The motors should now be quit and ready to go. | The motors should now be quit and ready to go. | ||
Latest revision as of 17:58, 2 December 2020
Back to Drone control
Contents |
[edit] ESC calibration
The ESC used her is
- Hobbywing 40A 3-6 Lipo cell controller.
Manual is here: https://cdn.shopify.com/s/files/1/0109/9702/files/User_s_Manual_Xrotor-en.pdf?7945784144032874852
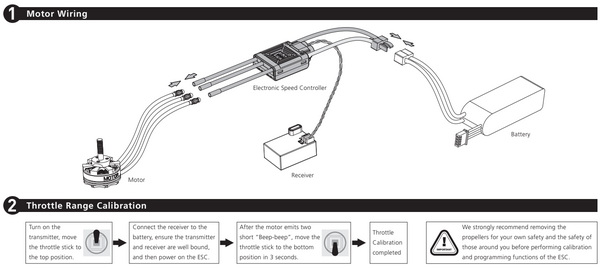
The calibration instructions are as in this figure, but use the GUI to set the ranges right.
Basic calibration instructions, but replace stick with GUI based calibration.
[edit] Gui based ESC calibration
NB!
- Remove propellers.
- Disconnect battery
[edit] Set to max 'stick'
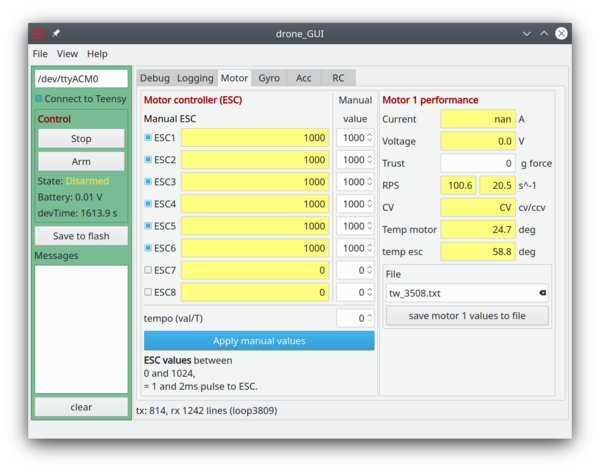
With the controller connected to the PC and connected to the GUI, set the manual motor value to 1000, as shown below:
Click all mounted motors to manual, Set manual value to 1000 for all motors and press 'Apply manual values'.
[edit] Connect battery and set 'stick' to 0
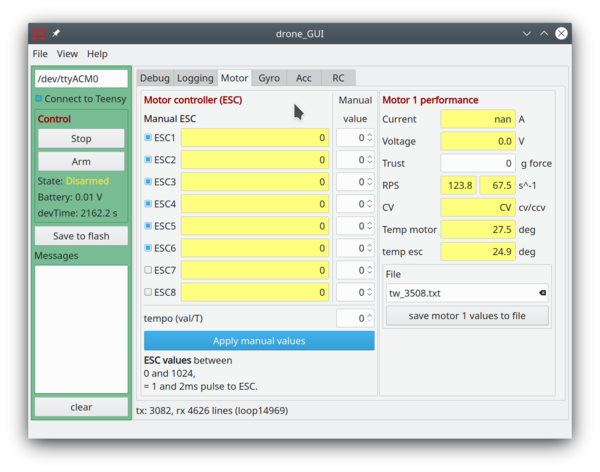
Prepare 0 value for all motors
Connect the battery and wait for the motors to beep twice! - then you have 3 seconds to change press the "apply manual values".
Set all values to 0 as shown by clicking "Apply manual values".
If you miss the 3 seconds, then the motors will beep 3 times, 4 times and then back to 2 times.
This can be difficult to hear with all motors beeping, so if in trouble, take one motor at a time.
Set values to 0 for all motors and press 'Apply manual values' (and apply within 3 seconds after the first two beeps!).
The motors should now be quit and ready to go.
[edit] Test propeller rotation direction
Use the GUI to set all motors to 5-10%, e.g. a value of 70, and check that they spin, and in the right direction.
- motor 1 CCV (seen from above)
- motor 2 CV
- motor 3 CCV
- motor 4 CV
- motor 5 CCV
- motor 6 CV


