Regbot
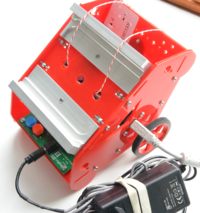
REGBOT is a small robot designed for exercises for our linear control course (PID control) (author).
Contents |
Hardware
Design overview can be found here.
REGBOT comes in 2 versions:
- version 1A - with robot numbers 1..15
- version 2B - with robot numbers 16..
Use software as is
To use regbot two software parts are needed - one for the robot (regbot.hex) and the client (regbot.exe (for windows)).
Client software
Get the client software (regbot.exe) from file sharing on campusnet, place it in a directory, this directory will be default for configuration file and result files from the robot.
A USB driver must be installed to get in contact with the robot - see installation in windows
The driver will (on Windows) create a com-port when connected - most likely com3 or any higher number. When the robot is disconnected by unplugging the cable, then the client probably needs to be restarted if it was connected when the cable was unplugged (no connection detect in windows).
The run the regbot.exe file.
User interface
The user interface can configure and run the robot, as well as inspecting almost all values on the robot. Written in python using Qt GUI library.
The User interface page has details.
Robot software
The robot software is compiled into a regbot.hex file, that is loaded into the robot flash disk using a teensy loader.
The loader is found here https://www.pjrc.com/teensy/loader.html.
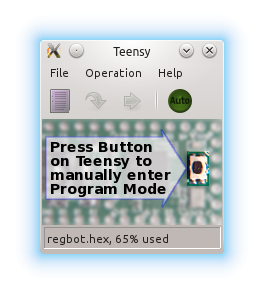
Start the teensy loader - it looks like this
Load the regbot.hex file (found on file sharing for the course) into the teensy loader application.
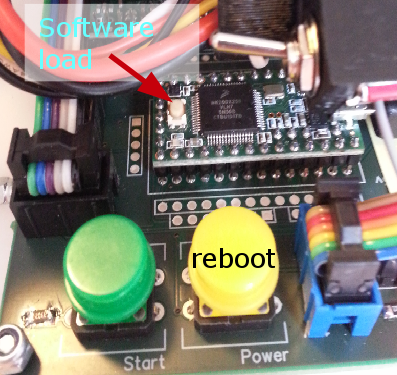
With the robot connected over USB, press the small "software load" button on the teensy board.
NB! It may take up to 30 seconds before the teensy loader detects the board.
Then press "Program" and "Reboot" on the teensy loader application. It may be necessary to press the big "reboot" or "power" button on the robot itself also. On some robots a total power cycle is needed to reboot properly. The robot should blink every 1 second with a short blink.
Software download
The source code for the robot and the client is available here. NB! the software source can not be compiled without the proper tool-chain (compiler and library for the robot and python and libraries for the client)
- Robot software (including regbot.hex): version 2.301 (as of 10 February 2016) - fixed error in disabling faulty velocity estimator.
- Robot software (including regbot.hex): version 2.290 (as of 5 February 2016) - fixed loss of ID if saved mission has more than a few lines.
- Robot software (including regbot.hex): version 2.285 (as of 31 January 2016) - ready for F16 course
- Client software : 2.290 (as of 5 February 2016) - fixed tilt offset error en saved configuration file (regbot.ini)
- Client software (including regbot.exe for windows): 2.285 (as of 31 January 2016) - ready for F16 course
repository for software - client and robot
- client: svn://repos.gbar.dtu.dk/jcan/regbot/qtgui
- robot: svn://repos.gbar.dtu.dk/jcan/regbot/regbot
- robot version 2.290 as zipfile from dropbox https://www.dropbox.com/s/s71s4w1x61cwpb2/regbot_290.zip?dl=0 )
On a Linux computer do something like this:
svn co svn://repos.gbar.dtu.dk/jcan/regbot/regbot .
svn co svn://repos.gbar.dtu.dk/jcan/regbot/qtgui .
Install software tools
The software tools to modify the software requires some tools.
- Software installation and tool-chain - Linux
- installation in windows and some of the tool-chain
- Schematic
Vision based Line Follower
Video of Line Following RegBot
In this first GIF a video is captured of the RegBot during it's run on line. The RegBot is set to take right turns.
This second GIF shows the run as seen on the RegBot. A rectangle bounding box is drawn around the boundaries of the tape-line contours. The red dot is the middle of the box/line and the blue dot functions as a navigation offset as the camera is mounted left to the center on RegBot and the RegBot should be driving on the center of the line.
How to use the application
When turning on the RegBot the Raspberry Pi and the Line Follower application will automatically start.
To wirelessly control and communicate with the RegBot and the Line Follower application open up a SSH session by using Putty on Windows and Terminal on Linux and Mac.
To access the RegBot type in:
ssh pi@hostname.local
where hostname should have been changed to regbotxx corresponding to the robots number.
The default password to a Raspberry Pi is raspberry, but this should have been changed to e.g. filippa corresponding to the robots name.
When the SSH session is open attach to the running Line Follower instance:
tmux attach
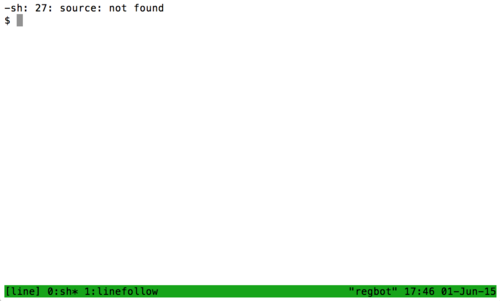
This will present a window like this:
In the bottom window 1 should be presented as 1:linefollow.
To attach to window 1 press Ctrl+B then 1.
As usual typing help will list the available commands for the RegBot.
Typing pihelp will give a list of commands to the Line Follower application:
         ### COMMANDS ###

pihelp:               this text
left:                 regbot will make left turns [default]
right:                regbot will make right turns
linemode=0:           regbot will run till end of line [default]
linemode=xxxx:        regbot will run till xxxx frames have been captured
black:                regbot will run on black lines [default]
white:                regbot will run on white lines
err=xx:               sets a threshold on how many errors the robot
                      can make before stopping - if it fails during turns,
                      this variable probably needs to go up! [default = 4]

        ### ######## ###
To run the Line Follower mission on the RegBot change the mission to M=8.
To detach (exit) the session do not type exit as this will shut down the running instance. Instead press Ctrl+B then D to detach and then close down the SSH session by either closing the window or typing exit.
Details on how to set up Line Following RegBot
Go to Vision based Line Follower for detailed information on the project and instructions on how to setup a new Line Following RegBot.


