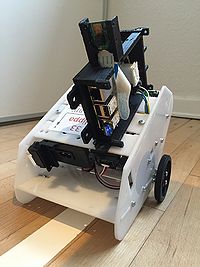
Vision based Line Follower
(→Install dependencies) |
|||
| Line 129: | Line 129: | ||
sudo apt-get install libatlas-base-dev gfortran | sudo apt-get install libatlas-base-dev gfortran | ||
| − | Python header files (in case further development should take place in python): | + | Python header files (in case further development or prototyping should take place in python): |
| − | sudo apt-get install python2.7-dev python3-dev | + | sudo apt-get install python2.7-dev python3-dev |
====OpenCV source code==== | ====OpenCV source code==== | ||
Revision as of 15:45, 3 March 2016
Contents |
Hardware needed
For installing and utilizing the line follower application for RegBot robots the following things are needed:
- A fully functional RegBot programmed with latest version of the robot software. Consult this section to ensure that.
- A clean Raspberry Pi (model 2 and above is preferred). In case the Pi is clean with an OS newly installed simply skip the install OS section in Software Installation.
- A Raspberry Pi camera modul.
- A mount for Raspberry Pi + camera module. Consult JCA for this.
- A few female/female jumper wires for connecting the Raspberry Pi with the RegBot.
- A WiFi dongle e.g. EDIMAX EW-7811Un (Raspberry Pi model 3 includes WiFi).
Also it would be good to have access to a "HDMI input"-screen in order to locally make the initial connection to WiFi and setup SSH for remote access.
Software installation
Instructions on how to install the needed software on a Raspberry Pi.
Raspberry Pi
Installing the OS
Use this link to download and install the newest Raspian OS on a SD card. Detailed instructions on how to write an image to a SD card is found within the link as well.
When the OS has been successfully installed insert the SD into the Raspberry Pi - connect a screen via the Pi's HDMI output and a keyboard + mouse set.
Setting up WiFi
Plug in the WiFi dongle and open up a terminal window.
In terminal open the wpa-supplicant configuration file:
sudo nano /etc/wpa_supplicant/wpa_supplicant.conf
Go to the bottom of the file and enter the information about the WiFi:
network={
    ssid="Your_SSID"
    psk="Your_wifi_password"
}
Save the file by pressing Ctrl+X then Y, then finally press Enter.
Restart the Pi by typing sudo reboot and it should automatically connect to WiFi when finished restarting.
Setting up SSH
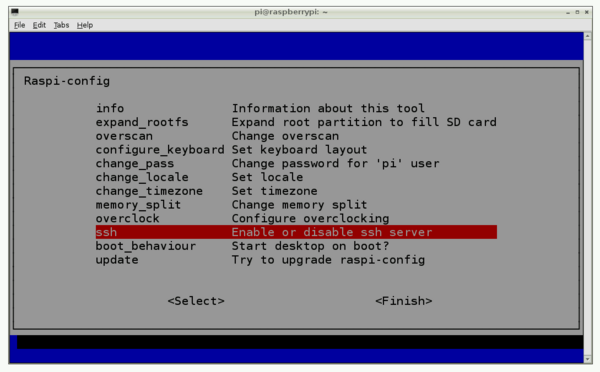
Make sure SSH is enabled. In terminal type:
sudo raspi-config
Scroll down to the "ssh" option and enable it.
Change the password while at it as well - default password is raspberry.
Get the Pi's IP address by typing sudo ifconfig.
Next to the wlan0 entry the inet address is present which is the IP address of the Raspberry Pi, and remote access to the device is available by typing:
On Mac and Linux:
terminal: ssh pi@ip_addr
On Windows:
putty: choose SSH --> pi@ip_addr
By now no screen, mouse or keyboard is needed connected for utilizing the Raspberry Pi.
Assign .local domain to Raspberry Pi
The Raspberry Pi's IP address will frequently change and this will result in spending a lot of time looking up IP addresses of devices. Instead one possibility is to assign a static IP to the device or a .local address to the device, which is the option explained here.
For Linux and Apple computers this should work right out of the box while Windows-users have to download Apple's Bonjour client (note that if Windows-users have iTunes installed then Bonjour is most likely installed as well, as it comes with iTunes). The Bonjour client can be downloaded here.
While still in terminal on Raspberry Pi install Avahi:
sudo apt-get install avahi-daemon
After the installation is done remote access is available by typing:
ssh pi@hostname.local
Default hostname is raspberry. Follow these instructions to change the Pi's hostname.
Mount remote folder
Working on applications that needs to compile and run locally on the Raspberry Pi it is very handy to mount the working folder locally on a PC or laptop. Doing this will make it possible to develop the code in a preferred IDE, and drag and drop files to/from the device.
On Mac and Linux go to terminal and type:
sshfs pi@hostname.local:/remote/folder ~/local/folder
Remember to create the local folder before mounting to it.
Network Bootstrapper
OpenCV 3
This guide will give instructions on how to get OpenCV 3 installed and working on the Raspberry Pi.
If not already SSH into the device.
Start by update and upgrade the Pi:
sudo apt-get update
sudo apt-get upgrade
sudo rpi-update
sudo reboot
Install dependencies
When rebooting is complete SSH into the device again and install some developer tools:
sudo apt-get install build-essential git cmake pkg-config
Image I/O packages:
sudo apt-get install libjpeg-dev libtiff5-dev libjasper-dev libpng12-dev
Video I/O packages:
sudo apt-get install libavcodec-dev libavformat-dev libswscale-dev libv4l-dev
sudo apt-get install libxvidcore-dev libx264-dev
GTK development library to compile the highgui sub-module of OpenCV:
sudo apt-get install libgtk2.0-dev
Dependencies:
sudo apt-get install libatlas-base-dev gfortran
Python header files (in case further development or prototyping should take place in python):
sudo apt-get install python2.7-dev python3-dev
OpenCV source code
Get OpenCV 3.0.0 from github and extract in root of Pi:
cd ~
wget -0 opencv.zip https://github.com/Itseez/opencv/archive/3.0.0.zip
unzip opencv.zip
Get the opencv_contrib repo as well:
wget -O opencv_contrib.zip https://github.com/Itseez/opencv_contrib/archive/3.0.0.zip
unzip opencv_contrib.zip
Compile and install OpenCV
cd ~/opencv-3.0.0/
mkdir build
cd build
cmake -D CMAKE_BUILD_TYPE=RELEASE \
  -D CMAKE_INSTALL_PREFIX=/usr/local \
  -D INSTALL_C_EXAMPLES=ON \
  -D INSTALL_PYTHON_EXAMPLES=ON \
  -D OPENCV_EXTRA_MODULES_PATH=~/opencv_contrib-3.0.0/modules \
  -D BUILD_EXAMPLES=ON ..
Now that the build is all setup, next thing is to compile OpenCV:
make -j4
-j4 stands for the number of cores to use and even when using full 4 cores this can take a very long time.
Assuming no errors occurred when compiling, install it to the system:
sudo make install
sudo ldconfig
Now OpenCV 3.0.0 should be installed on the Raspberry Pi system and ready to use!

